Such a little thing. (Mistakes, Electronic Music and Civil Rights)

I made a friend named Barbara Hemmert. She plays clarinet and bass clarinet with the Panama City POPS, which is one of the two orchestras in which I play double bass. Barbara is also the band director of 29 years at Jinks Middle school. As a result of this friendship, I became involved in creating and implementing an electronic music program for middle school students in Panama City, Florida.  And I think that my mom, who was a champion of civil and human rights, would have been proud.

I was taking an online course at Berklee School of Music in Boston to get an Ableton Live certificate.  A bit of background: Ableton Live is music production and performance software. And just to be clear, Ableton is the company; Live is the software. I had been introduced to Live a few years before,

Continue reading Such a little thing. (Mistakes, Electronic Music and Civil Rights)

Adding ambiance to an orchestra using Ableton Live

This post could also be called: An accidental study of technology and the classical musician.

Orchestral Ambiant Reverb Set-up for Ableton Live
Orchestral Ambient Reverb Set-up for Ableton Live

Recently I had the opportunity to perform an experiment using an orchestra, Ableton Live, and the convolution reverb “Spaces” by EastWest. The experiment – adding an ambient environment to the orchestra rehearsals – yielded mixed results but was a success in many ways. Continue reading Adding ambiance to an orchestra using Ableton Live

New Hope

In January of 2013 my piece entitled “New Hope” was premiered by the Panama City POPS Orchestra, Eddie Rackley conducting. This piece started out as “Remembrance”. But when we played Remembrance at rehearsal, what sounded fantastic on the composition software didn’t translate well to the live group. So a re-write was in order.

There were many happy accidents during that re-write and the piece New Hope was the result. Much more playable, full and frankly more interesting.

The premier went about as well as it could go. Don’t take my word for it. Here is the link to the video. The piece start around 4:30.

In Search of a Song – New Interview!

In 2012 an old friend of mine, Rich Reardin got in touch. In the mid 1980s I had recorded some music with guitarist Larry Clyman in our group “The Duo” at Rich’s studio in Bloomington, Indiana. Some of those sessions can be heard on my Soundcloud.com page.

Rich has an impressive radio show called “In Search of a Song”, where he interviews musicians of all types. He asked if I would like to do an interview on the show. It sounded good to me. Here is the link to all three parts of the interview. Enjoy!

In Search of a Song interview with David Goldflies

Remembrance – The Joy of Our Lives

Hello. I just finished tweaking a full orchestra piece called “Remembrance – The Joy of Our Lives.” At the bottom of this post you will find links to the audio on Soundcloud and a link to the full score of the piece.

In this post I wanted to talk a little bit about the process used to create this piece.

Continue reading Remembrance – The Joy of Our Lives

Taki, the violin and Ableton Live

A new song called “Taki” is on Soundcloud.

Here is a bit about the tune:

This song was written for and played by my good friend and great musician Takuya Horiuchi aka “Taki”. I had the good fortune of meeting and playing with him in April in a pit orchestra gig for the play Annie at GCSC. He had just left his concert meister gig with the Cedar Rapids Symphony and was exploring musical opportunities. His playing was nothing less than inspiring to ALL of us in the pit. After the gig I found myself humming this melody. Taki was kind enough to drop by the studio and record the melody. Over the last few months I have been adding “a band” to that melody.

Special thanks to:
David “Fingers” Haines – drums (please find this gentleman on YouTube- it will blow your mind!)

Amanda Matthews – Piano – who deserves special thanks for cutting this track on her last erg of energy for that day

Steve Cosper – Guitar – I finally dragged that rascal out of his house – what a great player!I am playing bass ( six string electric in this case)

And of course Taki for his inspiring violin work. You make me want to practice man!

Working in Ableton Live I have tried to make this track feel like a bunch of  musicians hangin’ out playing some music. Perhaps someday all the players can get together and do a few gigs. In the meantime, I hope you enjoy it!

I’ll post a lead sheet for this soon for download.

Balance and Form

Today’s thought – musical composition essentially comes down to a personal sense of Balance (to create equilibrium) between the elements used in the piece and their position, duration and (re)-occurrence in time – which I refer to as Form. Balance and Form. Why this thought? Why today? I’m not sure – but it seems with Ableton Live and all the sampling I have been doing from my environment (for instance a cicada sample sounds recorded at night in the country processed in Izotope’s Iris software) I spend most of my time tweaking how often, how long, how loud, how often to place the different events in time.

Exciting music (to me) is when these elements of Balance and Form are presented in non-intuitive or non-typical ways. The music of Swazack (for instance “No Sad Goodbyes”)  the music of John Adams (Shaker Loops – if you haven’t heard this – get it!), and the music of Terry Wiley  are great examples of modern approaches to Balance and Form. Really all music has these elements – active listening for these two elements is really rewarding.

It is easy to get caught in ever cooler and more interesting sounds – and that is a worthy and exciting exploration for sure (ok, it’s addicting!). But creating a piece seems more about the balance between the elements and the resulting form of the overall piece. Just like a 12 bar blues has a sense of returning to its beginning and then starts again, not so formulaic music relies on a self generated sense of these two elements. And, since everyone has their own sense of what constitutes a balance between simplicity and complexity, loud and soft, fast and slow, etc. it seems seeking your own unique Balance and Form in a piece creates an infinite set of possibilities for music.

A thought experiment – how few elements can be used to create balanced, well formed piece of music – one, two, three? Is 100 to many?

Even in one part, say a bass line – balance and form come into play. Listening and feeling when a part is “right” is to perceive the elements of Balance and Form directly.

And that is the thought of the day.

Quick Ableton Live Tip – Levels that don’t clip on the fly

I haven’t posted for a while… but my New Years resolution was I will post on this site more often. Let’s see, it’s June – not BAD! 😉

I have been using a simple technique to help me address a common issue I have in Ableton Live and I’d thought I’d post a short description of it in case it helped someone in the same situation.

So I’m up late working on a tune. I want to hear just a little more of the rhythm guitar. A few minutes later I might want the accents on the conga to pop up just a little bit more – up goes the velocity. +2db at 3.5k on the eq for vocal, now the bass drum needs a little more, and on and on it goes. Then you look at your master channel output meters – oh man, the level is in the RED! I’m not one to drop a limiter on the master channel and forget it – nope, I’m to old school for that. I figure getting my levels optimized before a limiter goes on is a good idea (however on a Live gig, a limiter is just the thing).

Now before I figured out this tip I would start the mix over just at an overall lower level. This worked but took quite a bit of time. The fact is often I like the relative levels of the tune I’m working on it is just that they are overall to loud.

THE TIP!

In either Arrangement or Session View left click on Track Title Bar to select it. (In the default “New Live Set” the Track Title Bars say “Audio” on track one and “Midi” on track two). After you have clicked on a Track Title Bar press and hold command and tap the “A” key. This will select ALL of your Track Title Bars.

Now, while these are all selected turn down one of the volume faders. You will see that ALL of them change. Nice eh?

Say I have a mix I am really liking but I get a peak of +2.27db (you can see this in the Peak Level Meter read out in session view on the master channel right above the Master Channel Fader. If you can’t see the Peak Level Meter roll over the line just above the Master Channel Fader, click and drag up on the line. Clicking on the meter resets the read out which lets you see current peak levels.) Select a Track Title Bar, Cmd A, adjust the level of a fader on any selected track down 2.5db (or 3db for just a tad of head room). You are done. No “in the red” level peaks for the overall mix.


This has saved me a LOT of time and lets me just keep working rather than trying to optimize levels when I’m trying to stay in a creative or production oriented state of mind.

A few notes:

1) If you have groups created for some tracks this technique only turns down the group master – not the levels in the group itself. That is great since many times, for instance in a string section I want to keep the section balance intact but just want the over all level in context of the entire mix to be reduced.

2) This technique can also be more granular – hold shift and click the various Track Title Bars that you want to make an Ad Hoc group out of for global editing. Very handy!

Note – if your peak is really high +6db or otherwise out of control you might have other issues in your mix. There may be one sample or instrument that is just to loud at a particular instant. This tip is really aimed a mix that doesn’t have other level problems, just those that in the normal process of tweaking tend to get a little hot. Oh, you might also need to bring up your playback systems listen level a bit once you adjust the overall levels since you turned down the entire mix. But clean, none “peaking in the red zone” mixes are what I like to have and this tip helps me keep in the flow while I am working.

BONUS TIP!

This technique of selecting all the tracks and making a change globally works for many if not all the parameters in Live. So if you need to change a send level, a follow action, expand, collapse or resize tracks in both Session and Arrangement view or pretty much anything you can think of, this can be a great tool for global edits.

Thanks for dropping by. Comments and additional tips welcome!

Tracking live musicians with Ableton Live

Since this is a post about tracking live musicians, first you need too find someone you want to record.

I just happened to meet Nick Savage, Alto Saxophonist with Bo Diddley on a gig I did in Destin, Florida. I had taken Ableton Live on stage that night and was switching between my 5 string Ibanez bass and playing bass synth with patches loaded in Live. Nick became intrigued with the sounds I was pushing out and on the break we talked a bit. Long story short we agreed too get together again and see what could come of it.

Nick called one day and said he was coming back to the area. I asked if he might like to play on a track I was developing for my Ableton 1 class project at Berklee Music. He said sure, he’d love to play.

My education tracking live musicians with Live started right then.

Nick showed up with a Genisis MXL mic. What a gorgeous sound we got from that mic. The first night was rough. I hadn’t really figured out my headphone amp nor how to create a submix using Ableton’s return tracks. Nonetheless we got some good takes but the sound in the headphones was too loud (or too soft) and I just wasn’t getting how to create the submix. We agreed to get together the next night and I knew I would spend the next day working with Ableton to get a great submix.

I had written Louden Stearns (my Ableton instructor) basically saying help! I had tried to create the return track and route the audio to its own output on my Focusrite Saffire 24 pro but it wasn’t working. Louden was very helpful and gave me the answers I was seeking. But putting them into practice took me a little while to figure out.

I first set up an audio track with a test mic (an SM 58) and verified I was receiving input from the mic/mic pre (my new VTB-1)/Saffire Pro 24 on the track. I optimized the gain at each point in the chain. I knew I was recording a single track of Nick (not stereo) so I set the Ableton Audio tracks’ AUDIO FROM Input Chooser to EXT IN (the default setting) and the chooser below that to 1 (for only recording 1 mono channel).

I then created a return track for this submix (right clicked on an open area either in Session or Arrangement view/Insert return track). On the master channel with the I/O controls visible I set the submix Return tracks’  Pre/Post toggle to PRE. This made the Audio tracks’ volume fader have no effect on the level sent to the Return track by the SEND level volume control.

The Saffire Pro 24 has a Mix Control program that provides a GUI for setting signal routing to various outputs. DAW 1 and 2 carried the main studio mix. I set DAW 3 and 4 to carry the headphone mix from the return track. I had patched two cables from the Saffire Pro outputs 3 & 4 into the inputs 1 & 2 of the Mini Headphone Amp. I centered the balance and turned up the volume on the Mini Headphone amp about 1/2 way. If I got signal to that unit I would see the LEDs light up.

I talked into my test mic and brought up the Send Level Control for my submix Return Track. And nothing worked. Zip. Nada. Not a peep or an led lighting up.

After a bit of just thinking about what I would do if I was an audio signal trying to reach a headphone amp I just started trying things. (This is the HAA! method meticulously documented here: http://www.goldfliesmusic.com/2011/08/haa/)

The final step (which after I did it seemed really obvious) was to change the setting in the AUDIO TO chooser of the Return Track from MASTER to EXT. OUT. In the 2nd chooser I then selected routing channels 3/4 and there was my signal being routed to my Mini Amp Headphone Amp. Bingo!

A good mix changes everything.

When Nick came by that 2nd evening I was able to dial in whatever we wanted into his headphone mix.  So we started cutting tracks. What was interesting is that we would make a pass and stop. I would then:

  • Command/Drag the Audio track under the one we just cut and create a new track with all my settings intact.
  • I  clicked on the audio data that came with the copied track and deleted it.
  • I turned OFF the Track Activator Toggle on the first track,
  • Clicked on the timeline  where I wanted the next take to start
  • Verified that the new track was record enabled,
  • Clicked on the global record button and then hit play.

It sounds like a lot to do but after a couple of passes this can be done very quickly. Keeping the flow of the session moving forward was critical.  While I’m running Live on a Macbook Pro, Nick is trying to play cool, creative licks. These are two very different mind sets and as the engineer on this session I wanted to get Nick into the flow of creativity and keep him there.

BTW, that is the goal of all of this – to get your performers into a mental state where the recording process is transparent and not a factor. You want their focus on music, expression, timing, pitch, the joy of a great, responsive sound.

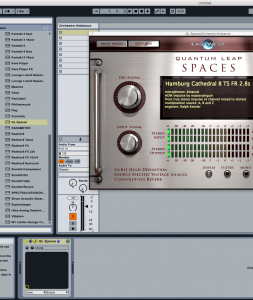
It is this last bit – creating a responsive sound where that I found an interesting technique I could use to inspire and in fact influence the performance. Nick and I finally got into a groove -me creating tracks and recording and Nick playing, I started thinking it would be cool to put some effects on the track. At first I tried just turning up the Send volume controls on a return track that had a reverb on it. I now know this would have worked had I assigned the Reverb Return Track to the same EXT. OUT and routing channels 3/4. When I didn’t get any reverb I  just real-time grabbed a Reverb from the Audio Effects Browser in Live and dropped it on the submix RETURN track. I adjusted the dry/wet level and reverb length on the fly.

All of a sudden Nick came alive. Hearing his horn in an ambient space made him FEEL like his horn was creating a real, 3d performance. He was controlling his space with his horn. Nick was able to play with the sustain of the note he just played and his playing just opened up. That was cool.

Never one to leave things alone I then dropped a delay on the track. Nick started playing staccato, pointed lines that worked with the timing of the delay. As I changed the reverb and delay settings Nick would adjust his playing. This got to be really fun. So fun I added an Auto Filter and start working with his timbre real time. He was digging it and dug even deeper for great horn lines.

When we came to the end of this process there was an unexpected bonus. All the changes I had made to the Live Fx patches had been recorded as automation data.. It was all there to use as we pleased.

I learned a lot that night. How to set up the submix. How important it is for the recording system to get out of the way of the performer. And how psycho-acoustic effects really can change the mood and output of a performer. While I’m the first to admit I’m Ableton centric, I couldn’t have been more pleased with the work flow of the software and the total realtime flexibility when tracking a live musician.

Later for this tune I tracked Bassist Steve Gilmore, vocalist Tony Delamont and Pianist Amanda Matthews. In each case the above techniques made each performer comfortable and able to give their best performance.

Here is the tune I’ve been talking about.

I’d love to hear about your tracking experiences. Feel free to comment or add your own tips and stories to this article.

HAA! & PHISE: Ableton Live and original musical parts

This is an article taken from my class work from my Berklee Music online class on Ableton Live (instructor Loudon Stearns). The subject – what are the benefits of original musical parts?

Benefits of creating original musical parts

By parts I will include not only parts determined by instrument/note order (such as a trumpet, timpani or guitar part) but also a part that is either a hybrid or pure synthesis/sampled sound (not related to note order).

I have found a few approaches to building sounds and parts in Live.

The first I will title the “Happy Accident Approach” (HAA – sometime written HAA!). This method is the try it and see what happens method. It is a very powerful approach given the extreme sound shaping control available in Live. Load a patch, lob on some effects, twist some dials and as often as not, be amazed by the cool sounds coming out of your monitors. This method, though time consuming shouldn’t be underrated as the results can be very useful. I have a few tools that help me with this:


1) Touchable for the IPAD: Touchable has a very cool mode when working with devices. It is called snap mode. When snap is enabled the value of the parameters in place at the time of enabling snap mode are “sticky”. Then, when you change a parameter (say filter type, resonance, etc.) you hear the change in sound while you move the device parameter but once you take your finger off the IPAD the parameter snaps back to its original value. This is neat tool for experimentation. Although it can take some hand contortions to modify multiple parameters at once, you can get some very interesting sounds and then “Snap” back to your original sound.

Also the physical modeled (gravity/bounce) X/Y pad… major HAA! potential there.

2) Kapture Pad for the IPAD: This is essentially a librarian for the settings currently in your Live Set. You can work with sounds, device and effect settings and more and then “Kapture” a snap shot of the current state of LIVE. These snapshot can be grouped in BANKS, labeled and recalled non-sequentially. This is a simple and effective tool for allowing sound exploration while not losing what you previously had in terms of previous settings. A cool thing about Kapture Pad is that the bank/setting info is stored on the host computer, not on the IPAD allowing for any Ipad with the Kapture pad software to access the saved information. The information can also be archived (backed up) from the host for safe, off site storage.

3) Koncrete Performer: Somewhat less intuitive but visually alluring is Koncrete Performer. This is an actual controller for Live with a librarian attached. The interface are Multiple Nodes controlled by touch. Individual/Multiple parameters of Live’s devices are mapped to the nodes and can be controlled via touch. You sort of have to see this to get the idea but the interface is visually breathtaking. Projecting this interface during a performance would make a very appealing visual for an audience.

All of these tools allow for creating and archiving “Happy Accidents”.

The second method I use for creating musical parts is what I would call “Pre-Hearing Intuitive Sound Envisioning” (PHISE).

This method is a bit more unreliable but can be a HUGE time saver over HAA!. The main method with PHISE is to Pre Hear what it is you want to hear in the real world. Here are a few of the ways that this manifests:

1) Song idea inspiration – have you ever ridden in your car and started to sing a melody? Quick, grab the recorder on your phone and capture that melody. Now when you sit down to Live, input that melody into Live and start building out the tune. You have successfully used PHISE.

The Next Note Theory (NNT)

(briefly stated – at any moment in a piece of music, the most relevant information is the next note)

2) Using NNT, PHISE is expresed as follows: You have built a song/sound structure and you envision another part as yet UNPLAYED. It can be a vague direction or a clear path to the next part, chord change, sound, effect, rhythm, whatever. That is PHISE at its best.

To use this method you have to allow yourself to be very cognizant of the burst of creativity that your mind has provided to you in terms of a sound choice, a chord change, an effect, – any yet unheard (imagined)  part of the project you are working on (or have yet to start).

Warning – it is VERY easy to ignore these PHISE moments. I recommend you don’t. They are rarely convenient, can invalidate the work that came before them and can lead to to many directions from a very simple core. My recommendation is to document them all and when you aren’t having PHISE moments use the more rational mind and the HAA! approach to flesh out the inspirations.

Of course this process doesn’t have to be linear. You may be working on a project and pre-hear something on an unrelated project. STOP. Record or otherwise document that idea.

Finally, the two methods can work hand in hand. Happy Accidents lead to PHISE that then lead to Happy Accidents which then lead to… you get the idea.

So after doing all of that, what are the benefits?

1) No copyright infringement lawsuits
2) Other musicians dig what you are doing
3) Really great musicians and producers want to interact with original artists
4) You start to appreciate originality in other art forms (dance, architecture, painting)
5) In some case, wealth, fame, and a 401 K can come with successful marketing of original music parts.
6) It feels good to create original music parts.